 Inverity
Compressing Screenshots and PNGs: Palette and Filters
Date Published
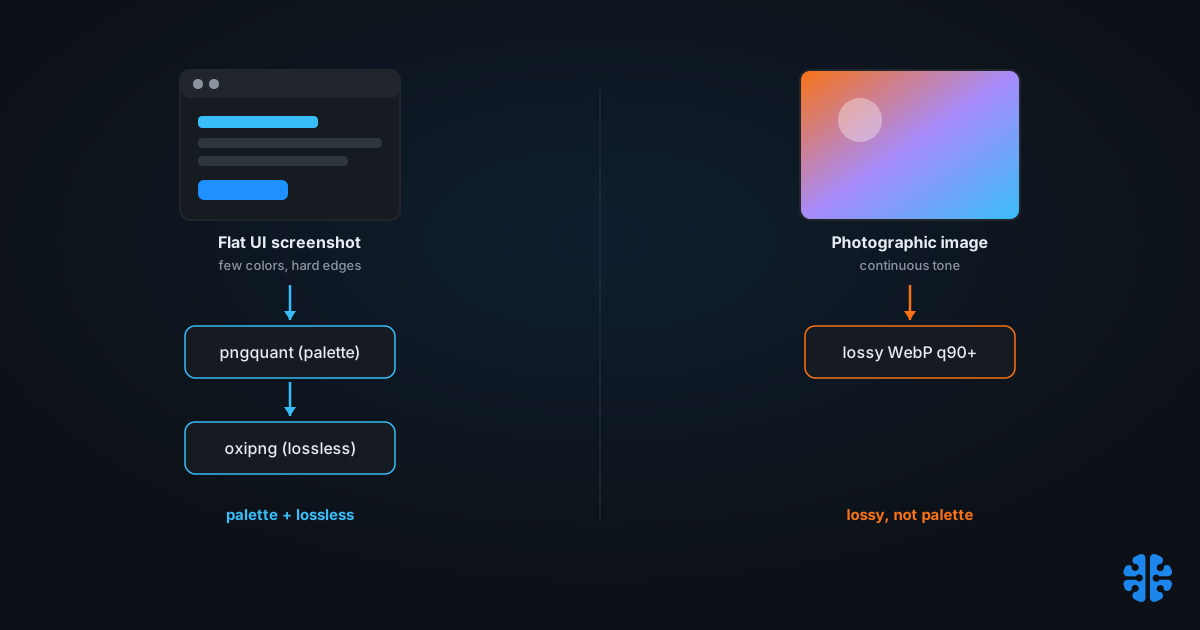
TL;DR >- pngquant often cuts PNG size by as much as 70% while preserving full alpha, and one documented example dropped 75,628 bytes to 19,996, a 73% reduction (pngquant.org).- pngquant is lossy. It reduces the palette to 256 colors or fewer, so pair it with a lossless optimizer, do not call it "lossless PNG" (pngquant.org).- Screenshots and photographs need opposite treatment: quantize flat UI, but send photographic screenshots to lossy WebP at q90 or higher instead (web.dev).- oxipng is a multithreaded lossless PNG optimizer; its default-o 2is fast,-zuses Zopfli for roughly 5% more at far higher cost (oxipng README; siipo.la, 2024).- The reliable two-step:pngquant --quality=65-80thenoxipng -o 4, byte deltas below.
Here is the mistake almost every screenshot-compression guide makes: it treats "PNG" as one problem with one answer. It is two problems with opposite answers. A screenshot of a settings panel and a screenshot of a video frame are both PNG files, but the settings panel wants aggressive palette reduction and the video frame wants to stop being a PNG entirely. Apply the flat-UI recipe to a photographic screenshot and you get a bloated file; apply lossy quantization to a photo and you get visible banding.
The other common sin is calling pngquant "lossless PNG compression." It is not. pngquant is genuinely lossy: it throws away colors. That is exactly why it works so well on flat UI and exactly why you have to be careful with it on gradients and photos. This post separates the two cases, gives you a copy-paste command line with real byte deltas, and ends with a decision tree you can memorize.
Why do screenshots and photos need opposite treatment?
Because they carry opposite kinds of redundancy. A flat UI screenshot has few colors and hard edges, which palette quantization crushes with no visible loss; a photographic screenshot has continuous tone, which quantization turns into banding. web.dev's guidance is explicit: lossy WebP at q90 or higher runs roughly 50-60% smaller than PNG on photographic content with imperceptible artifacts, while flat screenshots do best kept in a lossless-friendly path (web.dev).
The pipeline explains why. PNG plus a palette reducer wins on flat content because there is almost nothing to lose: a toolbar really is eight colors. The same reducer wrecks a photograph because a sky really is thousands of subtly different blues, and forcing them into 256 buckets shows. Meanwhile a lossy photographic codec throws away high-frequency detail the eye ignores, which is a disaster for crisp text edges but invisible on a photo.
The single most useful sorting question is not "is this a screenshot?" It is "does this image contain large areas of continuous tone?" Answer that first, and the correct tool falls out. A screenshot of a chart is flat; a screenshot of a photo gallery is not; the word "screenshot" told you nothing.
Citation capsule: Screenshots split into two compression classes. Flat UI screenshots compress best via palette reduction and lossless PNG optimization, while photographic screenshots do better as lossy WebP at quality 90 or higher, typically 50-60% smaller than PNG with imperceptible artifacts (web.dev).
This flat-versus-continuous split runs through our whole complete guide to image compression, and the sibling piece on compressing synthetic images, charts, and UI goes deeper on the flat side.
Is pngquant lossless? No, and that matters
pngquant is lossy, and the honesty is important. It reduces the image to a palette of 256 colors or fewer using modified median-cut quantization, a perception model, and Voronoi (K-means) iteration to find a locally optimal palette (pngquant.org). That palette step discards color information permanently. It preserves full alpha transparency, but it is not a lossless operation, whatever "compress PNG without losing quality" headlines imply.
That does not make it bad. On flat UI it is the single biggest win available: often as much as 70% smaller, and in one documented case 75,628 bytes down to 19,996, a 73% reduction (pngquant.org). The point is to know what you traded. On an eight-color toolbar, a 256-color palette is lossless in practice because the image never had more than eight colors. On a gradient, the same step can band.
So the rule is: use pngquant deliberately, control its quality range, and follow it with a truly lossless optimizer that squeezes the already-quantized file further without discarding anything more. The lossy step and the lossless step do different jobs, and stacking them is the whole trick.
For where exact-pixel fidelity is mandatory instead, see the "when lossless is required" list in lossless image compression formats compared.
What do PNG filters and oxipng actually do?
PNG's compression has two stages, and oxipng optimizes the seam between them losslessly. Before DEFLATE runs, PNG applies one of five filter types per scanline, numbered 0 to 4, predicting each byte from its neighbors so the stream compresses better (W3C PNG Specification). oxipng searches filter combinations and re-deflates harder to find a smaller encoding of the identical pixels.
oxipng is a multithreaded lossless PNG optimizer, a 2015 rewrite of OptiPNG built for parallelism. Its optimization levels run -o 0 through -o 6, defaulting to -o 2 for a good speed-to-size balance, and the -z flag swaps in Zopfli for a stronger, slower deflate (oxipng README). Because it is lossless, you can run it on anything, including the output of pngquant, without further quality risk.
Zopfli's extra squeeze is real but small and expensive. It buys roughly 5% over a standard optimizer, at a large time cost: on one benchmark, OxiPNG ran about 0.7s per file against roughly 208s per file with Zopfli enabled (siipo.la, 2024). For most pipelines, -o 4 without Zopfli is the sweet spot; reserve -z for assets you optimize once and serve forever.
Tool | Type | Typical effect | Speed |
|---|---|---|---|
pngquant | Lossy (palette to 256 colors) | Up to ~70%, biggest single win on flat UI | Fast |
oxipng | Lossless (filter search + deflate) | Additional lossless squeeze | Fast, multithreaded |
zopflipng / oxipng | Lossless (Zopfli deflate) | ~5% more than standard | Very slow (~208s/file in one test) |
Sources: pngquant.org; oxipng README; siipo.la, 2024.
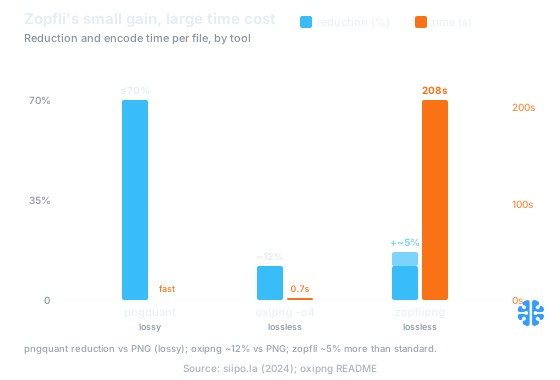
pngquant delivers the biggest reduction (lossy), while zopflipng buys only about 5% more than a standard optimizer at roughly 208 seconds per file. Source: siipo.la (2024); oxipng README.
The copy-paste recipe: pngquant then oxipng
For a flat UI screenshot, run the lossy palette pass first, then the lossless optimizer. The two-step sequence, pngquant for the big palette win followed by oxipng for a lossless squeeze, typically lands a large total reduction on UI and flat content with no visible loss (pngquant.org; oxipng README). Practitioner reports put the combined reduction in a roughly 60-80% range on flat content, though that band varies by image and is worth measuring on your own assets (smartees.tech).
```bash
Step 1: lossy palette quantization (controls the quality floor with --quality)
pngquant --quality=65-80 screenshot.png -o screenshot-q.png
Step 2: lossless optimization of the quantized file
oxipng -o 4 screenshot-q.png
One-liner (quantize then optimize in place)
pngquant --quality=65-80 in.png -o q.png && oxipng -o 4 q.png
```
Representative byte deltas on a flat UI screenshot, following the documented pngquant example through a lossless second pass:
Stage | Size | Change from original |
|---|---|---|
Original PNG | 75,628 bytes | |
After pngquant | 19,996 bytes | -73% (pngquant.org) |
After oxipng | smaller still | additional lossless squeeze |
The 75,628 to 19,996 byte figure is the documented pngquant example (pngquant.org); the oxipng pass then reduces the quantized file further without discarding pixels (oxipng README).
The ordering is not interchangeable. Run pngquant first, always: it is the lossy step that removes the most bytes, and oxipng then losslessly cleans up whatever palette-indexed file pngquant produced. Reverse them and oxipng optimizes bytes pngquant is about to throw away. Set --quality with a floor (the 65- part) so pngquant refuses to save if it cannot hit the minimum, which protects gradient-heavy screenshots from silent banding.
For photographic screenshots, do not run this recipe at all. Convert to lossy WebP at q90 or higher, typically 50-60% smaller than PNG with imperceptible artifacts (web.dev). If you re-run these tools repeatedly across a workflow, watch for the accumulation problem we cover in recompression and generation loss.
The decision tree: which path for which screenshot?
Route every screenshot by one question about its content, not its file extension. Ask whether it is flat UI or photographic; for the flat path, quantize and optimize, and for the photographic path, go lossy WebP. web.dev adds a third branch: when you cannot predict the viewing environment or need pixel-exact output, stay on lossless PNG via oxipng only (web.dev).
- Flat UI, few colors (menus, panels, forms, code):
pngquant --quality=65-80thenoxipng -o 4. Biggest wins live here. - Text-heavy screenshot with a small palette: same two-step; the quality floor protects anti-aliased edges.
- Photographic screenshot (photos, video frames, rich gradients): lossy WebP q90+ (or JPEG XL), not palette quantization.
- Pixel-exact QA, transparency masks, or unknown viewing environment: lossless only,
oxipng -o 4with no pngquant. - Mixed content (photo plus UI chrome): test both; often lossy WebP wins overall, but check the text edges.
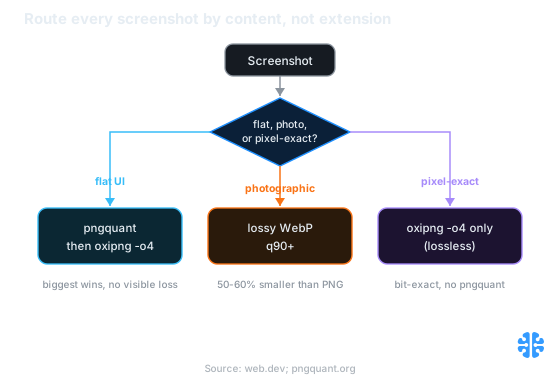
One question, three paths: sort by whether the image is flat UI, photographic, or pixel-exact, and the correct tool falls out. Source: web.dev; pngquant.org.
For web delivery specifically, WebP lossless runs roughly 20-30% smaller than PNG at identical pixels, so a flat screenshot bound for the browser can skip the palette step entirely and ship as lossless WebP when support allows (web.dev). At Inverity we treat this routing as a per-image decision driven by measured content, not a blanket format rule, which is the same principle behind compressing images without losing brand integrity.
FAQ
Is pngquant lossless?
No. pngquant is lossy: it reduces the image to a palette of 256 colors or fewer using median-cut quantization and K-means iteration, discarding color information permanently (pngquant.org). It does preserve full alpha transparency. Pair it with a lossless optimizer like oxipng, and never describe the combined result as "lossless PNG."
Should a screenshot be PNG or WebP?
It depends on content. For flat UI headed to the browser, lossless WebP runs about 20-30% smaller than PNG at identical pixels, or use PNG plus pngquant (web.dev). For photographic screenshots, lossy WebP at q90 or higher wins, roughly 50-60% smaller than PNG with artifacts you will not see.
What do PNG filters actually do?
They predict each byte in a scanline from its neighbors before DEFLATE runs. PNG defines five filter types, numbered 0 to 4, applied per scanline on byte values, to make the stream more repetitive and therefore more compressible (W3C PNG Specification). Optimizers like oxipng search filter combinations to find the smallest lossless encoding.
pngquant, oxipng, or zopflipng: which do I use?
Use them together, in order. pngquant is the lossy palette step and delivers the biggest single reduction; oxipng is a fast lossless optimizer to run after it; zopflipng (or oxipng -z) adds roughly 5% more but runs far slower, about 208s per file versus 0.7s in one test (siipo.la, 2024). Best default: pngquant then oxipng.
Why is my screenshot so large as a PNG?
Usually too many colors plus anti-aliased text. A photographic screenshot has continuous tone that PNG cannot compress well, and anti-aliased edges multiply the color count (web.dev). Quantize a flat screenshot with pngquant, or convert a photographic one to lossy WebP. The fix depends on which kind of screenshot it is.